Supersized iPod remote control for the visually impaired
By Andrew Pollack on 12/29/2005 at 10:21 PM ESTThe Supersized, Super-Easy iPod Remote Control
The goal was to create an MP3 playing device which could be easily used by my father-in-law who is 87 on Sunday and is rapidly loosing his vision. He can now see almost no detail. Unfortunately, he has never been a technically oriented person and has had a very hard time using the adaptive technologies. Were I to give him a typical MP3 player, it would be lost in moments, and even while in his hand would be unusable.
An iPod is ideal for him in other ways, however. It can easily hold one or more full unabridged audiobooks so that he has no need to swap tapes or cd's, for example. What a shame that it is totally unavailable to someone with his needs. My search for a suitable device had failed utterly, so I opted to build one.
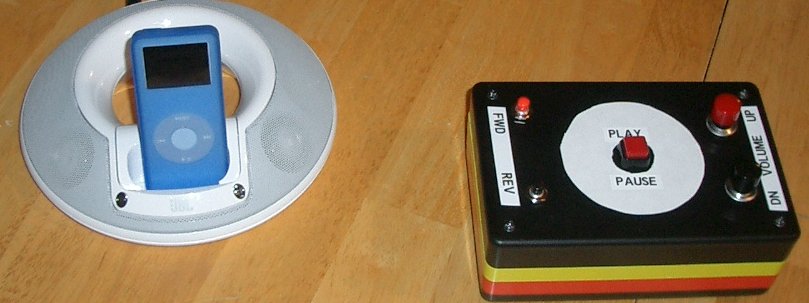
The image below shows the iPod Nano in a protective silicon sleeve,  |
The first chore was finding an MP3 player and remote control suitable for altering. I ended up using an iPod specifically because there are more accessories for them than the other products. I then set about testing remote controlled base stations. My requirements were simple, but specific. It must keep the iPod charged, have reasonable sound quality, have a radio frequency based remote control (rather than infrared) and most of all the simple remote must operate the same way regardless of what state the iPod is in when placed in the cradle. The iPod may be "on" or "off" -- asleep, awake, or whatever. This last requirement was the hardest.
I settled on the "JBL On Stage II with Remote" which does all of those things wonderfully. In fact, I can even leave the iPod Nano set with the "Hold" switch engaged and the remote will work as expected.
 The Next Step was to alter the Remote Control
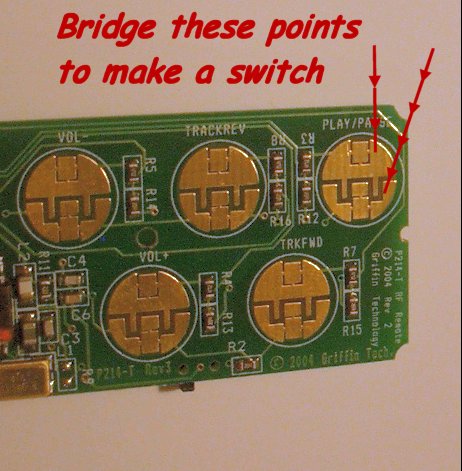
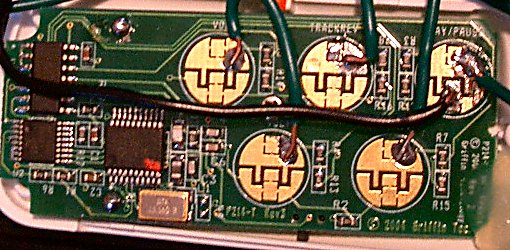
As you can see from the picture to the left, the circuit board in this case was extremely easy to understand. Each of the five buttons was clearly marked on the board, and to close the switch you simply connect both halves of the round contact area for each button. 
The Finished Product, as you can see, has the five momentary contact switches mounted on a large black box. The switches are designed to be easy for him to use without seeing (the labels are for my mother-in-law so she can see what the buttons do and explain it to him each time he asks until he remembers). The center button is large and square. It works to start and stop the audio. The large round buttons on one side are volume up and volume down. Finally, the very small round buttons on the other side work as forward and reverse. The white circle on top in the center along with the red and yellow stripes on the sides of the box are simply to make the until easier for him to spot while he still is able to see high contrast areas.
Thanks Andrew.
Bruce
remote I suggested, I can see you've totally uncomplicated the interface by
removing buttons that aren't needed.
One thing to tell the mother-in-law is that Menu+OK (Menu + the centre button)
held down for a few seconds will reboot the iPod. The reboot keystroke exists
for a reason, it will hang occasionally and she'll likely need it at some
point.
to make an automated reboot switch. That might be something nice to add,
instead of hunting with two hands and limited motor skills.
Great design. I may use this for my father too, if I can’t find an mp3 CD
playing boombox with remote.
a remote for the visually impaired (old windows 95 "high contrast" theme
anybody?) but it's good to see that someone came up with one on their own. I
find myself making little hacks for my father with his laptop to keep it
useable, like backlit keyboard, crisper display, etc, and it's nice to know
that the entire tech community doesn't believe that visually impaired
individuals should be left to fend for themselves. For example, when was the
last time you saw one of the older, huge buttoned telephones in your local
store? Tech companies all assume that everyone over 50 has their 30 year old
phone or 20 year old tape recorder. I mean, that's just of they don't want to
embrace new technology! My father wanted a caller-id enabled phone but we
couldn't even find one with a display bigger than 2" across and an inch tall.
Here's a little hint for people with this sort of attitude: do you think the
learning process stops at 30, or 50? For the hackers, do you ever want to stop
hacking, or learning? Personally, I want to learn something new the day I die,
and new technology needs to remember that if they don't cater to customers who
can't afford lazer surgery / eye implants / artificial eyes they're going to
loose them. Once again, bravo, excellent hack, and keep up the good work. A
neat addon would be some small motion sensors that detect if something moves
over a button, and plays a small sound clip through an internal speaker, IE if
someone passes their finger over the "play" button, a voice from the remote
says "play button." Might not be too difficult, and it's something I'll look
into as well.
I wanted to build when my grandfather was still alive, but I kept letting
people talk me out of it.
Has your father-in-law learned braille yet? If so there are some products that
you can use to label the buttons for him. <
http://www.maxiaids.com/store/ProdList.asp?idCategory=162&idstore=1&category=Ite
m_Identification >
Even if he doesn't know braille, a you might develop some short hand or simply
number the buttons to correspod to the number of dots in a cell.
If you don't already know, Maxi-Aids
a good supplier for raw materials for future handicap related builds. They
have some nice stuff, and some that is almost, but not exactly what you really
want.
Keep hacking.
loose sight later in life have a hard time with braille.
Bob is a person who has spent many years gardening and sailing since
retiring from his own business. His hands fingers are not sensitive to the
small dots of braille, and his natural dexterity is much less than it ever was.
To make matters worse, he's never been a technology oriented person. He's
the sort of person who has for years placed a magazine over the vcr clock so he
didn't have to see it flashing. That's why I built this for him. I couldn't
see a realistic way for him to handle cd's and tapes well.
Maxiaids does have some good things. My wife has done several of the same
things you mention, like making "puffy dot" coded numbers on playing cards so
he can play bridge. For the most part, the technology available in places like
that is so far behind the rest of the world that its a real shame. A device
like this is so easy to build, that its a real shame it doesn't exist.
The follow-on to this is a portable version, with a slot for the iPod to sit
inside. That will require a bit more work.
deal actually, I may use it on my blind aunt.
Thanks for the idea!
would do this for not your own father but your in-law. Very clean 70's style
remote by the way. I haven't been blessed with the whole soldering mod genius
but I am willing to learn more. I check out hackaday.com daily and this is the
first comment I've had in over a year. Job well done man.
skills to make life better for another person.
I wonder if your father-in-law would appreciate large "arcade"-style buttons:
www.happcontrols.com
Alan, Washington DC
parts that should be much more reliable than the garbage sold at Radio Shack.
I could see a big 80's style arcade "Fire" button being perfect for the center
of a rig like this.
years of hackaday, engadget, gizmodo etc. Great work! Keep hackin'!
Francesco
Griffin AirClick, which i disassembled after seeing this post.
http://www.griffintechnology.com/products/airclick/
another great hack for this remote is to add a length of wire to the antennea
lead for improved range.
great work helping your father in law, i'm sure he loves that thing!
almost-blind great aunt how to use an IPOD to listen to books, but the IPOD is
just not do-able for her. Have you made other remotes? How can I get one? Its
perfect!
ipod screen, and to use the bottons on a ipod. So my question is this, how does
your grandfather know what book he is on, and wich one he wants to switch too?
I am very interested in your big remote for an ipod. I need something similar,
but not because I'm visually impaired, but because I'm a musician who wants to
play live with backing tracks but does not want to fork out for a laptop,
footswitch or whatever other bulky, expensive alternatives there are out there.
I feel an adapted version of your box, with wider spaces between the buttons to
allow for foot control might be just what I need. I am willing to pay for your
services and would provide any equipment/information needed. Please reply to
farmerzootickles@yahoo.co.uk.
Cheers,
Steve.
first, this is a great hack. I found this blog entry a while ago just after I
had hacked something similar. I'm Squares on Both Sides' (see website above)
companion when we play live and we had a similar problem. Until recently, we
always took a multi-track hard disk recorder on tour because it has a
foot-switch input that allows us to start and stop samples while we play the
songs. This got annoying like he*l because we were always dragging a big and
heavy box around (contrasting with our aim of not always having to use a car
for touring but being able to go by train with light luggage!).
For our last mini-tour to Luxembourg and Holland, we used a hack we made
ourselves and it worked, with all modesty, nothing short of awesome. Here's
what we did:
My friend (SoBS) got one of these cheap remote adapters similar to the one on
this website: http://www.maushammer.com/systems/ipod-remote/ipod-remote.html
For our use, the remote did not have to be IR or wireless; the wired style is
actually far more reliable when used on stage.
What you need next is some sort of adapter from the remote to a 1/4" jack
(mono, guitar-jack style) for the cable that runs to the foot-switch. What will
work is a modification of built-in 1/8" jack that is originally intended for
the headphone outlet by scratching open the PCB tracks of the audio signal and
then connecting the contacts of the play/pause switch to the solder pads of the
jack, making sure that you do not short out any Vcc to ground connection within
the remote with the new wires -- and then use an external adapter from the 1/8"
outlet in the remote to the 1/4" plug of the footswitch. I found this solution
not to be very rugged, though, so here's what I preferred to do:
I took the remote apart and soldered two small wires to the switch of the
play/pause button. This is a bit tricky to do, but if you have some soldering
skills and a small iron, you'll do fine.
The next thing you need is a housing that will take the now-disassembled remote
and the outlet for the 1/4" guitar-style jack. Of course, any small box will
do, so let your imagination play -- but I thought that an old computer mouse
that happened to be in my pile of e-junk was the best-looking and possibly
coolest way to go. I took everything out of the mouse except the ball because
some weight will help it stay in its place once the heavy cable to the
foot-switch is connected. Then, I drilled a hole for the 1/4" jack on the side
of the mouse and used the rubber feed-through for the mouse cable at the top
end of the mouse as a way to run the cable of the remote that went inside of
the mouse.
Now, you have to connect the two wires from the play/pause switch to the 1/4"
jack. At the switch, you might find one 'hot' contact, possibly connected via a
pull-up resistor to Vcc and going to an input pin of one of the ICs, and one
ground contact, possibly connected to a somewhat larger PCB track or
ground-plane. It seems to be the best idea to connect the 'hot' wire to the
'tip' end of the 1/4" jack and the 'ground' wire to its 'sleeve' end (cf. lower
part of the picture here: http://en.wikipedia.org/wiki/Tip_and_ring).
Use some cable straps or adhesive tape to secure everything in the new housing.
You're done!
Some notes:
I first tried to put a 100 nF capacitor across the switch contacts in order to
improve the behaviour in case of contact bounce or noise pickup with the long
cable to the foot-switch connected. This did not work. The remote-control seems
to already have some means of (firmware-coded?) contact de-bouncing. Do not use
any extra capacitors or RC-filters on the switch inputs.
While it would be easier in terms of exact timing of the samples you wish to
play when the play/pause action would happen when you push down the
foot-switch, the remote actually sends the play/pause singals when you release
the switch. This might take some practice, but it works.
Do not hold the foot switch for too long. This will turn off your iPod when you
actually want it to play something.
If you have questions concerning the project or wish to contact me, my friend
will be happy to forward any e-mail you send via
http://www.myspace.com/squaresonbothsides. You can also go check it out live in
the not-so-far future at this festival:
http://www.eatthismedia.org/front_content.php?idcat=221&idart=280
and totally mechanically uninclined - her hands tremble, though she does not
have Parkinsons and it is extremely difficult for her to press nor see the
correct buttons on any type of electronic gadget. Your Father is a mirror image
of her.
Any assistance would be appreciated.
you printed this page and took it to Radio Shack, I'll bet they'd know someone
who could do this for you pretty cheaply.
Other Recent Stories...
- 01/26/2023Better Running VirtualBox or VMWARE Virtual Machines on Windows 10+ Forgive me, Reader, for I have sinned. I has been nearly 3 years since my last blog entry. The truth is, I haven't had much to say that was worthy of more than a basic social media post -- until today. For my current work, I was assigned a new laptop. It's a real powerhouse machine with 14 processor cores and 64 gigs of ram. It should be perfect for running my development environment in a virtual machine, but it wasn't. VirtualBox was barely starting, and no matter how many features I turned off, it could ......
- 04/04/2020How many Ventilators for the price of those tanks the Pentagon didn't even want?This goes WAY beyond Trump or Obama. This is decades of poor planning and poor use of funds. Certainly it should have been addressed in the Trump, Obama, Bush, Clinton, Bush, and Reagan administrations -- all of which were well aware of the implications of a pandemic. I want a military prepared to help us, not just hurt other people. As an American I expect that with the ridiculous funding of our military might, we are prepared for damn near everything. Not just killing people and breaking things, but ......
- 01/28/2020Copyright Troll WarningThere's a copyright troll firm that has automated reverse-image searches and goes around looking for any posted images that they can make a quick copyright claim on. This is not quite a scam because it's technically legal, but it's run very much like a scam. This company works with a few "clients" that have vast repositories of copyrighted images. The trolls do a reverse web search on those images looking for hits. When they find one on a site that looks like someone they can scare, they work it like ......
- 03/26/2019Undestanding how OAUTH scopes will bring the concept of APPS to your Domino server
- 02/05/2019Toro Yard Equipment - Not really a premium brand as far as I am concerned
- 10/08/2018Will you be at the NYC Launch Event for HCL Domino v10 -- Find me!
- 09/04/2018With two big projects on hold, I suddenly find myself very available for new short and long term projects.
- 07/13/2018Who is HCL and why is it a good thing that they are now the ones behind Notes and Domino?
- 03/21/2018Domino Apps on IOS is a Game Changer. Quit holding back.
- 02/15/2018Andrew’s Proposed Gun Laws


the buttons are laid out in a symmetrical manner.
You might want to put "grip" tape (with a different texture) along the "top"
edge so that he can tell by feel which way round it is ?
Also - small point - but given that he has limited visual ability, making the
buttons a high-contrast with the background (white, for instance) might help
also ? Its a small point, as I'm sure (as you've anticipated) that he'll be
using this by feel most of the time...
Hope this helps - and good work!
---* Bill